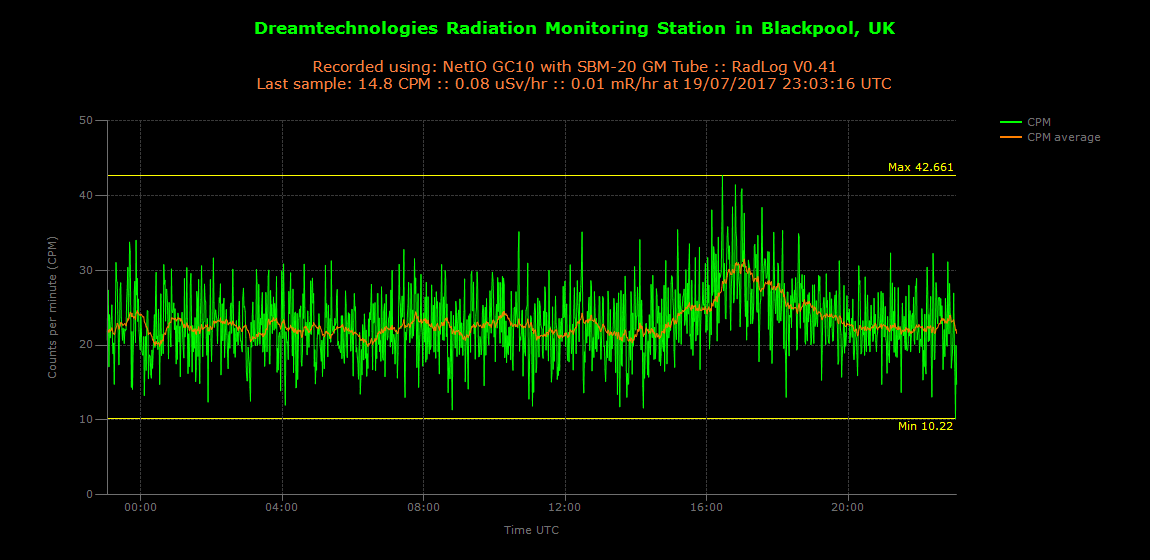
Blinky's Lab

Radiation

All posts tagged Radiation by Blinky's Lab
  • Posted on

    Archived from radmon.org - originally posted 27/08/2019

    This is a list of the common radioactive sources available on ebay (at the time of writing - 31/08/2019)

    They vary a lot in radioactivity and I own all of these so I will try and give you my opinion of how active they are using an SBM-20 tube, in a rough, roundabout way. They will be marked 1 to 5 (5 being most active) based on the samples I own and based against each other. Where I have included the emission type (a, b & y (alpha, beta & gamma)) this is the overall emission. A lot of the different radiation types are caused from the main radionuclide decaying into other radionuclides. It is worth noting that different samples, even of the same type will more than likely produce different levels of radiation. For instance I have a Uranium glass sample (the one in my profile picture) and a Uranium glass vanity tray. The vanity tray is about 25x the volume/weight of the sample, yet the sample is very much more active than the tray. When buying rare samples, ores and minerals or other specific radioactive things the buyers will sometimes state 'high activity' or words to the effect.

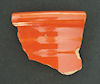
    Fiesta Ware: It is a Uranium glaze on pottery. Pretty active (b & y). Does not fluoresce. Geiger click score: 4/5 Ebay search: 'fiesta ware' 'fiestaware' 'uranium glaze' 'uranium pottery' enter image description here

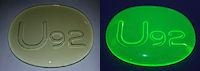
    Uranium Glass: It is a glass coloured using Uranium similar to Vaseline glass. It does fluoresce. It's active (b). Geiger click score: 2/5 Ebay search: 'uranium glass' 'vaseline glass' enter image description here

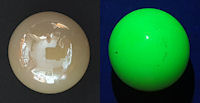
    Vaseline Glass: Just like Uranium glass but different colour. It does fluoresce. Not very active (b & y(?)). SBM-20 click score: 1/5 Ebay search: 'vaseline glass' 'uranium glass' enter image description here

    Thorium Gas Mantle: A gas mantle impregnated with Thorium. Does not fluoresce. Goes like Billy'o (a, b & y). SBM-20 click score: 4.5/5 Ebay search: 'thorium mantle' enter image description here

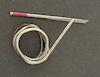
    Thorium Tungsten Electrode: A Tungsten welding rod with <2% Thorium. Does not fluoresce. Hardly active (a, b & y). SBM-20 click score: 0.5/5 Ebay search: 'thorium tungsten' 'thorium electrode' enter image description here

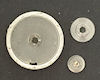
    Americium disc: A small disc of Americium used in smoke detectors. Does not fluoresce. Quite active* (a, b & y). SBM-20 click score 3/5 Ebay search: 'americium' 'geiger smoke sensor' *Goes to 11 when using a tube capable of detecting alpha - LND-712 alpha tube click score 10/5, but does have to be close. enter image description here

    Tritium Gas: A small Phosphor coated tube of Tritium gas. It does fluoresce and glows in the dark. Hardly even noticeable** (b). SBM-20 click score 0.1/5 Ebay search: 'tritium' **Quite detectable with a scintillation meter. enter image description here

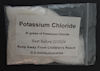
    Potassium Chloride: Also known as Potassium salt or KCI. Preferably has to be pure >99%. Does not fluoresce. Not very active (b & y). SBM-20 click score: 1/5 Ebay search: 'potassium chloride' 'potassium salt' enter image description here

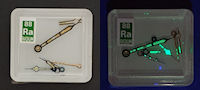
    Radium Ra-226: Used mainly in the past for 'glow in the dark' watch hands and clock dials. Some heavy concentrations can be found on old aircraft clocks and dials. It does fluoresce. Quite active (a & b). SBM-20 click score: 2.5/5 Ebay search: 'radium' 'radium watch hands' enter image description here

    Uranium Ore: Just that, also known as Pitchblende. Does not fluoresce***. Reasonably active. SBM-20 click score 3/5 Ebay search: 'uranium ore' 'pitchblende' ***If you get Pitchblende with Gummite on it, the Gummite will fluoresce. enter image description here

    There are other natural forms of Uranium available on ebay. I don't have any so I can't comment on them. But the search terms are: 'uraninite' 'torbernite' 'autunite' 'gummite'

    It is also worth searching for the general keywords such as 'uranium' 'thorium' etc. as occasionally you will find a hidden gem amongst the cruft. It was through that I managed to find Uranium trioxide sample, Uranium dioxide sample (yellowcake), soil contaminated with Uranium and Radium (from near a Uranium mine in Germany) and Thoriated cotton (some weird dirty looking fluffy stuff with tiny rocks mixed in - from a mine in Wales). So with some thorough searching you can sometimes find those rare gems and some really make the Geiger click!

    A note on safety. Some of these sources can be very harmful and potentially deadly (over time) if inhaled or ingested. Take Radium watch hands for example; the sources are usually a number of years old and the Radium (paint) can crumble and fall off the watch hands very very easily. It is too easy to get this on your fingers then inadvertently be ingested. Besides the radioactivity of the substance a lot are also biologically toxic to humans and other animals. When buying any radioactive source it is prudent to know your substance and learn about the hazards involved with it. If in doubt always wear gloves, keep a clean area when using the samples and clean/wipe down surfaces and wash hands after use. Always keep sources in a suitable container. Internet search for 'Radium girls'. A very sad but informative story.

  • Posted on

    Archived from radmon.org - originally posted 25/08/2019

    On a radmon.org forum thread we sort of got to discussing the thickness of Aluminium for shielding beta but I didn't want to divert that thread too much so started a new thread on this subject here.

    I had quoted, roughly in all honesty, that 5mm aluminium would do well for beta shielding and was met with this reply by user FSM19:

    For a beta shield you need 3mm of aluminium, foil isn't thick enough, UK Civil Defence geiger counters and ionisation instruments, such as the Meter Doserate Portable No 1 Trainer, Meter Doserate Portable No 1 and the Meter Survey Radiac No 2 had diecast bodies about 1/8" thick to act as a beta shield - the latter two could be used to detect beta by removing the bottom of the case. For a few more details see my site https://tocsin-bang.000webhostapp.com/radiac.html .

    So which is it? 3mm or 5mm? Turns out neither and both are true from what I can work out.

    I have done a some research on beta shielding for an up coming project and I must say that I find trying to work out what would be the ideal thickness for using aluminium quite confusing. I have read on various sites, papers and opinions (whether educated or not) the thickness should be anywhere between 0.5mm and 15mm! I have a Meter Survey Radiac No 2 and just popped the bottom off to have a look. The internal aluminium shield is 3.2mm but there is also the outer cover (also aluminium) that is 2.4mm, making a total thickness of 5.6mm. It is my understanding that whilst the inner shield may be used or not for shielding of beta the outer cover must always be in place as this offers humidity protection for the ion chamber inside. So when using the Meter Survey Radiac No 2 you would always have a minimum of 2.4mm with an additional 3.2mm shield depending on what you were surveying.

    In all honesty the 5mm I quoted on this post is a rough semi-educated guesstimate that would stop most beta from passing. So I did a little more research. It turns out that the density of the material is the key factor and basic equations can be used to calculate the thickness of aluminium for shielding:

    That is, provided you know the range of the beta particles, in which case you need to know the energy for the particular beta particles. There is something known as Feather's Rule where: Betas with a maximum energy above 0.6 MeV: Range(g/cm2) = 0.542 E -0.133 and Betas with a maximum energy below 0.8 MeV: Range(g/cm2) = 0.407 E1.38

    So it is looking like the thickness of aluminium shielding is directly relative to the energy level of the beta particle. But it gets more confusing than that as there is bremsstrahlung (braking radiation) that causes electromagnetic radiation from the slowing or deflection of the beta particles. However bremsstrahlung can pretty much be ignored in energies below 1MeV.

    Here are some of the web sites I have used for reference:

    https://www.nuclear-power.net/ https://www.nasa.gov/sites/default/files/files/SMIII_Problem25.pdf https://www.nrc.gov/docs/ML1122/ML11229A721.pdf

    I know, my brain hurts too..... 🫤

    I forgot to include the density of aluminium. From this page: https://www.thyssenkrupp-materials.co.uk/density-of-aluminium.html

    The density of aluminium is about 2,710kg/m3. The density of the alloys of aluminium does not vary widely from this figure ranging between 2,640kg/m3 and 2,810kg/m3.

  • Posted on
    Increase in Radiation During Downpour

    Archived from radmon.org - originally posted 19/07/2017

    Blackpool UK - 19 July 2017 - Started around 17:00 BST / 16:00 UTC

    During quite a downpour today, 20mm in one hour. At it's peak was 65mm/h. Background radiation increased by approx 50% / 11CPM over a 2.5hour period. Not much by any means but still an indication there was some radioactive substance in the rain.

    Please note the Radmon graphs are UTC and the rain graphs are BST (UTC + 1) and so there is an hour difference between them.

    enter image description here

    enter image description here

    enter image description here

    enter image description here

    What caused it? I could be anyone's guess. Radon causing decay products to get caught up in the rain? Radioactive cloud blowing over from somewhere? Radioactive UFO floating about somewhere overhead? 😂 It should be noted that the difference from ~21 CPM to ~30 CPM is miniscule. It is so tiny it causes no concern whatsoever. I found it interesting that the slight rise coincided with a downpour.

  • Posted on

    Archived from radmon.org - originally posted 04/04/2016

    I have finished up building/setting up my home radiation monitoring station and is all up and running. :cheer:

    https://www.schmoozie.co.uk/radmon/ (currently offline.)

    enter image description here

    I won't go into too much detail as it is pretty much just a NetIO GC10, in an enclosure with a couple of buttons and switches added. It is mounted outside under a canopy on my workshop so rain is no issue and I have used all sealed switches/buttons etc with rubber gaskets on each to seal it up nicely. The window for the tube at the front is covered with some Kapton tape to seal that up also. Power is taken from a 5v PSU inside the workshop but here is the interesting thing, (for me anyway) the RS232 output is sent over wireless transceivers to my computer in the house at the other end of the garden. I'm pretty happy with it so far and the only thing I want to do to finish it is either paint it or cover in some kind of vinyl or similar to make it pretty.

    I used two HC11 RS232 transceivers, one connected to the GC10 and the other connected to a USB FTDI adapter (USB <> RS232 adapter). The transceivers work very well so far hardly missing a beat. They worked for me right out of the box with no additional configuration needed. Check them out at this link , but you can get them much cheaper on ebay. I paid £2.96 each including shipping for mine, so it was probably cheaper than buying actual cable to run the RS232 and saved all the hassle or running a cable etc.

    This is the receiver that sits on my windowsill: enter image description here

    I put a bag of silica gel desiccant inside the enclosure to aid in keeping moisture at bay. I have done this for years whenever mounting any kind of enclosure outside and it works a treat, keeping everything dry and electrical contacts clean and shiny.

    Some years ago I went through a period at work of designing and building custom switches/keypads for use in sauna, steam rooms and swimming pools. They were only basic with a couple of buttons on them but they were in very hostile (to electronics) environments. The circuits were potted and that kept the circuit happy and the switches/buttons were hermetically sealed. The case covers were all gasketed but this left the main connections to the 'elements' inside the enclosure. In testing these would last for weeks even months, but they would eventually fail. The failure mode was corrosion on the incoming cable terminals where it was connected to the circuit. At first The design was changed and a cable was soldered directly onto the board and potted in. This worked great provided the installers would install them correctly, but they didn't. Mainly they would cut down the cable, use a terminal block and just shove it behind the switch/keypad. Some even drilled a hole in the back of the enclosure and put the terminal block inside the enclosure pretty much leaving it to the elements.

    I changed the design slightly so the cable was potted in and soldered to the board, like the last, but the cable was only 3" or so with a fairly robust connector. I added a bag of silica gel (as big as I could fit in the enclosure) and that pretty much solved the issues of the terminals/connectors corroding. I learned that no matter how much you think the enclosure is sealed, unless it is airtight, it will eventually pull in some moisture. This is down to the fact that as the enclosure and contents heat up the air expands and may push some out. Then it will cool down, the air inside cools and contracts, creating a very small vacuum in the enclosure. Air from outside with a higher moisture content will be sucked into the enclosure and with that happening every day the enclosure would eventually get enough moisture inside it would condense and corrode the contacts. This was in very harsh environments especially in steam rooms but the same will happen outside, it will just take much longer. I usually change silica gel bags in my stuff outside every year or so and that keeps them nice and happy.

    I have been playing about a bit trying to make my website 'radmon' page look nifty. I'm pretty pleased with the page so far.

    I use radlog to transfer the locally generated graph to my website. I grab the european map from radlog.org in an iframe and then grab each of the six history/trend data images from radlog.org. Because I like a black background and use that on my page, the images right from radlog.org have white backgrounds and look poor, so I run them through a PHP image filter to change the colours negative, cache them locally and display on my page.

    enter image description here

  • Posted on

    Archived from radmon.org - originally posted 20/03/2016

    After some more testing and investigation I found the issue in sketchy GPS was actually the code. I've fixed it and the results are much, much better. There is just one tiny issue now where the CPM being read from the counter is recorded occasionally with an extra digit or two counts on one record. I reckon once that is sorted I can call it version 1.0 :)

    I have updated the download link with the latest code. Here are the results so far:

    https://www.google.com/maps/d/edit?mid=zasLAdbQXqtw.kInoUYbBsJO8&usp=sharing

    enter image description here

    I changed the way the serial CPM is read and that appears to have fixed the issue with the serial data not being read properly..

    I have uploaded the changes to the zip file and can be found here.

    It does very occasionally miss the first digit from the CPM but knowing what I know now about why this is happening it would require a complete rewrite of the code. The issue is caused by the timing from the CPM being transmitted by the GC10 and then the serial is being read by the microprocessor. If the CPM is transmitted from the GC10 before the microprocessor is ready to read it it missed off the first digit. I left it logging all night and I found this happened 3 times in 10,000 records. So whilst not 100% perfect I feel this is 99.9% perfect and is certainly decent enough for my requirements.

    I'm happy to call this version 1.0 :cheer:

  • Posted on

    Archived from radmon.org - originally posted 19/03/2016

    I have sorted the battery issue by adding a couple of 18650 Lipo's and a buck converter to regulate the voltage to 5.0V. That seems to be holding up well. The entire unit (logger and counter) consume about 10ma at 20CPM background radiation so roughly working out if my batteries are 2000mAh (they state 2600mAh but I doubt I will get that) and the unit uses 10mA then it should last for around 200 hours! I just need to sort a charging circuit now to charge the batteries when the unit is powered from 12v from the car, or mains adapter.

    I went out for a quick test with it and it seems to be OK except for sketchy GPS data. I think I need to improve the GPS antenna, so adding an external antenna should sort that. I have a Peugeot car with heat reflective windscreen and it plays havok with most cheaper GPS receivers. At least I'm hoping that is the issue!

    Here is the data for anyone interested and a quick picture of what it looks like so far: https://www.google.com/maps/d/viewer?mid=zasLAdbQXqtw.kxVyakPPw-s0

    enter image description here

  • Posted on

    Archived from radmon.org - originally posted 17/03/2016

    I recently bought myself a DP-66M from ebay, then another one, then a NetIO GC-10 and I have another on the way. Maybe a different one soon? It's fair to say I have been bitten by the Geiger counter bug!

    I am building a static outdoor monitoring station at home, monitoring 24/7, but currently waiting on parts from China. In the meantime I have been playing with the GC-10 and built a prototype mobile GPS logging unit to take on my travels. I live not too far from Heysham power station and the Westinghouse Springfields nuclear fuel manufacturing site, so I will be having a drive around them soon to see if there are any elevated levels

    enter image description here

    The unit uses an Arduino Pro-mini at the core, with a GY-GPS6MV2 GPS receiver module and a Catalex SD card module. All are cheap as chips on ebay from China. The Arduino takes the GPS data via RS232, the CPM from the GC-10 RS232, does a little processing and parsing of the data and shoves it on the SD card in a CSV. Each time the logging is started it creates a new filename generated from the date/time so should be easy to get the data and upload it to Google maps or something similar (I haven't gotten round to that part yet). There is a bi-coloured LED that changes from red to green when a good satellite lock is acheived and it will not start to log the data on the card until a valid date/time is received from GPS. This keeps the CSV files nice and tidy with proper logs only.

    In testing I have had issues with the batteries (2x AA via a 5v boost converter to the GC-10), but I think that was down to bad batteries, so I am currently testing on fresh batteries. I checked the current and it is pulling just under 4mA at the batteries, so whilst they won't last long, it should be enough for some walky-walky monitoring. I plan to add an external GPS antenna/socket and maybe a couple of 18650 Lipo batteries and charger/protection circuit/module. I think it would be nice to be able to power from either the car 12v or maybe a 5v USB type power input that would charge the batteries when plugged in, but that is for another day.

    enter image description here

    A zip file containing the source/schematic etc. can be download here: GPS Geiger Counter. Please note this was a long time ago and may contain old library code, so may not compile as is.

    Contained in the zip are some photos of my prototype build, the Arduino source and schematic so anyone that wants can go build one also! Some knowledge of electronics/arduino will probably be needed as I have not, nor intend on doing a step-by-step.

    ETA: I forgot to mention that this can be used with any Geiger counter that spits out the CPM over RS232, such as the counters to connect to Radlog.

    AETA: I also forgot to mention that some of the code is a little clumsy and probably not very efficient, especially the LED part for changing the colour etc, but that said it does seem to run well on the Pro-mini.